
Tutorial: Building your first website using a free website template (part 2)
This is part 2 in a series of blog posts that will explain how to use a free website template to build and publish a complete website. Read part 1 for an introduction to the tutorial and for instructions on how to follow it and how to submit feedback that will affect future parts.
In the first part of this tutorial series, I asked for suggestions on what template I should use as an example. In the comments to the post, several readers suggested that I should use the Variant Duo template. Since this series will be written based on feedback and suggestions from those of you who follow it, I will be using Variant Duo as one of the examples. But I also wanted to have a somewhat more advanced template that would provide some customization options, so earlier today I released a new free template made specifically for this tutorial. It is called Learn CSS and I will be using it to show how small changes to the stylesheet can be made to give the template and the website you build from it a more unique look. In that process, I will also release alternate versions based on the changes that are made throughout the series. But learning more about CSS is a topic for future parts. In this part I will start from the beginning.
Free or commercial templates?
When you have decided to build a website using a website template, the first thing to do is to find a starting point that fits your needs. There are a lot of websites that offer high-quality templates, both free and commercial. In general, commercial website templates are more advanced and include a lot more material than free templates do. Such material can be various kinds of scripts, source files for the design, fonts, user guides and/or stock photos that can be used on your website. This is useful in many cases. For example, source images for the design allows you to modify backgrounds and header images, and if the template uses a header or a navigation menu where the images contain texts (such as website name or button link titles) you can use the source files to edit the texts. But this can also make it harder for a beginner to get started since you may need to use image editors to make several changes before the template can be used at all.
The templates on andreasviklund.com do not include any image source material, but it is not needed since all text seen in the template are written directly into the HTML code, allowing you to edit all content without being forced to use an image editor. Further on, my website templates are not created with any specific topic in mind, so any template can be used for any kind of website – unlike many commercial templates which are often created for a specific category of sites. For example, commercial hosting company website templates can show a photo of a server rack in the header while business website templates can include a photo of people in suits at a business meeting. The lack of specific topics provides more freedom, but at the expense of a more generic look which means that the template design doesn’t stand out as unique in any way. This is of course not always true. There are generic templates in the commercial market as well as free templates with specific topics, but it is less common.
First step: Finding and downloading a template
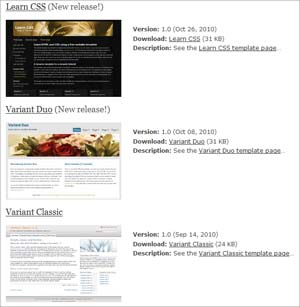
 The target of this tutorial is to build a simple and useful website from a generic template from the andreasviklund.com template gallery, so the first thing to do is to browse through the different templates to find one that looks suitable. On the templates page you can see thumbnails that give you an idea of what the different templates look like. If you click on one of the images or on the title for any template, you will come to a page with more information about that template.
On each single template page there is a download link (for some templates several download links for different versions of the template), information about the size of the download, the date when the template was released and a link to a live demo of the template. There is also a short description of the template and one or several screenshot thumbnails. The thumbnails can be clicked to see the images in larger formats including full size images. There is one screenshot for each layout option that the template includes, and some templates have screenshots showing the alternate versions of the template where the design or layout has been modified. For example, andreas08 is available in two versions where one version has got different colors and the option to use background images.
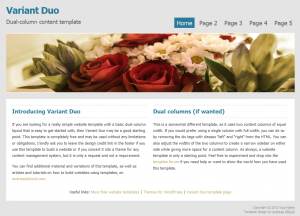
Once you have found a design that you like, click the download link to download the template to your own computer. The templates are packed in a .zip archive, so it is one single file to download for each template. As mentioned, I will use Variant Duo as the example here. You can download it directly through this link.
Second step: Unpack the template
 Once you have downloaded the template, open (or unzip) the .zip file and you will find a folder that has the same name as the .zip file, in this example “variant-duo”. Rename the folder to “My website” or anything else you may want to call it, and open it. You will find three files in the folder:
- index.html – The HTML file. This file includes the actual content (title, headers, texts and code to show content images) and the general structure of the template.
- variant-duo.css – The CSS file, also called the stylesheet. This is the file that defines how the content in the HTML file is presented when viewed in a web browser.
- sample1.jpg – The only image used in the template, a wide photo (980×250 pixels) showing flowers that is used as the header image in the template design. It is displayed through a line of code in the HTML file.
With the template unpacked to your computer, you can browse it by opening it in your web browser. When you start working with the template, you will be editing these files and preview all changes through the web browser. It isn’t until at a later stage when the template has been modified into a complete website that it will be published to the web, so when viewing the template in the browser you are only looking at your local files for now.
Third step: Finding software to edit the template
As explained in the first part of this series, there are many ways to build a website – even when you have decided to use a website template as your starting point. For editing a template on your own computer, there are two different kinds of editors that you can use.
The first kind is the visual HTML editor that opens up the template in a similar way as a web browser does but allows you to edit the content. Visual editors are often called WYSIWYG editors (“What You See Is What You Get”), which means that you see the entire template design while the code that forms the design and creates the structure of the content is not shown. Using a visual editor is a simple way to edit a website template, and many visual editors include website templates to give website builders a quick start. One such example is Style Master (a commercial editor available for Windows and Mac, costs $59.99), which includes a number of my templates. Another example is the free NVU editor (freeware available for Windows, Linux and Mac).
The second kind, which is the kind I will use in this tutorial, is the code editor. Unlike a visual editor which displays the design, a code editor shows the HTML and CSS code that websites are made up from. The code is basically only plain text so any text editor can be used to edit it. But specialized code editors include tools that make editing easier, for example by giving different parts of the code different colors to make it easier to see what you are editing. Learning to edit the code directly is not as easy as using a visual editor, but it gives you full control and a greater understanding of how the web works. And by using a website template as a starting point you don’t need to know what all parts of the code does, so you can learn things in small steps. I will be using a freeware code editor called Notepad++ (available for Windows only) in this tutorial, but there are editors with similar functionality for all operating systems such as Smultron for Mac and BlueFish for Linux (both are free).
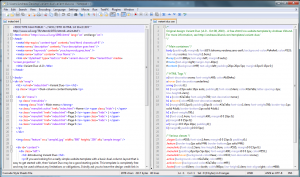
This is what Notepad++ looks like when index.html and variant-duo.css are opened in the program (click to see a larger version):
There are also editors which allows editing in both WYSIWYG mode and in the code itself. For further reading about editors I recommend Wikipedia’s List of HTML editors and the HTML editor article which also explains why code editors give more control over the result. If you have any questions regarding editors, write them in a comment to this post and I will do my best to answer.
Moving on…
Continue to part 3 where the structure of HTML is explained and where the code editing starts…
This article was written by Andreas Viklund
Web designer, writer and the creative engine behind this website. Author of most of the free website templates, along with some of the WordPress themes.
