

Tutorial: Building your first website using a free website template (part 3)
This is part 3 in a series of blog posts that will explain how to use a free website template to build and publish a complete website. Read part 1 for an introduction to the tutorial and part 2 that describes how to download and unpack a template and finding an editor for your operating system.
In the last part of the tutorial, the Variant Duo template was downloaded and extracted to your local computer, and the file structure of the template was explained. Now it is time to take a closer look at the code using a code editor. If you haven’t downloaded and installed any code editor, go back to part 2 of the tutorial for links to different editors that you can use. When you have an editor in place, open index.html from the editor to get started!
Index.html – the structure and the content
When the index.html file is opened in a web browser, you see the full template design with the included sample content. But when you open index.html in a code editor, this is what you will see:
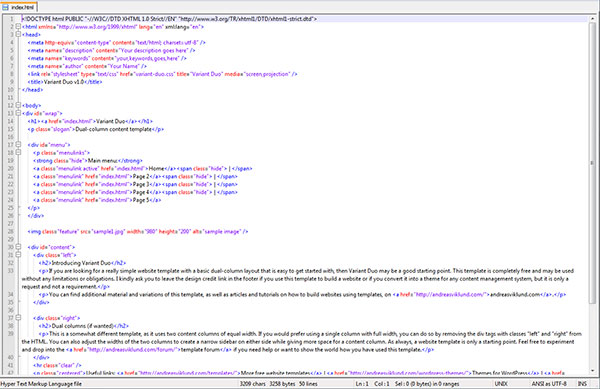
In order to understand the structure of the HTML code, we need to take a look at the template design and the different parts of it. Variant Duo is a simple template that can basically be said to have there are basically six main sections:
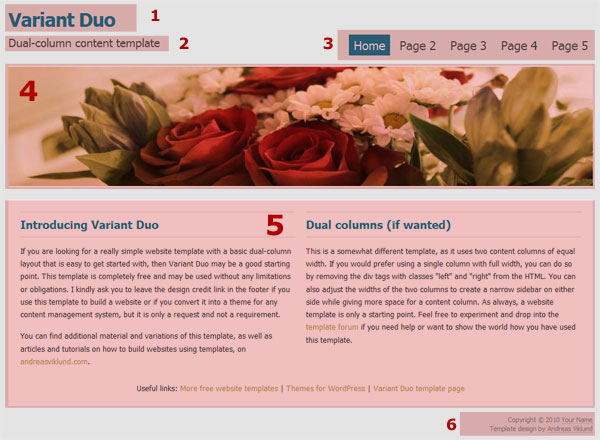
1. The website title.
2. The slogan or tagline.
3. The navigation menu.
4. The header image.
5. The main content.
6. The footer.
Each of these sections can be found in the HTML code, and each section (with the exception of the header image) can be directly edited by simply editing the corresponding HTML text. But as simple as it may sound, how are the different parts written in HTML? We will take a closer look at that soon, but before that you need to be familiar with what HTML tags are and how they work.
What is a HTML tag?
HTML is a markup language (“HTML” stands for “Hyper Text Markup Language”), and it uses a set of markup tags in order to describe different kinds of content that are referred to as “elements”. A markup tag is a decriptive label written between angled brackets, and each markup tag consists of two parts: a starting tag and an ending tag. The text between the starting and the ending tag is the element that is marked up. Here is an example:
<html> Example of HTML code. </html>
Note that the ending tag includes a “/”. The tag used in the example is the “html” tag, and it is used to define HTML documents so every HTML document should start with <html> and end with </html>.
There are a lot of different tags available, and several different web standards with different sets of tags and different rules for how they can be used. Variant Duo uses a standard called XHTML 1.0 Strict. I will write more about different standards in future posts, but you will only need to learn a few tags to get started with editing your template. For now there are two important things to remember:
- All tags must be written in lowercase.
- All tags must be closed by an ending tag.
The basic structure of a HTML file
The basic structure of the index.html document looks like this:
<html>
<head>
(this is the HEAD section, which contains meta tags that describe the document)
</head>
<body>
(this is the BODY section, which contains the actual visible page content)
</body>
</html>
For now, we will ignore the head section of the code and focus on the part of the code that is found below the <body> tag.
1. The website title – the <h1> tag
The title of the template is “Variant Duo”, and the code that outputs it can be found on line number 14 in index.html. The code looks like this:
<h1><a href="index.html">Variant Duo</a></h1>
There are two tags in use in the code above. First of all <h1>, which is a header tag. There are six levels of header tags, h1, h2 and so on up to h6, where h1 is the first level. The use of header tags in HTML documents can be compared to using headers in an ordinary text document or in a book, as headers should be used in a logical structure. If <h1> is compared to the title of the book, then each chapter should have a <h2> header – and sub-sections of each chapter should have <h3> headers.
In Variant Duo, this means that <h1> is used for the site title, <h2> is used for header texts in the page content and <h3> is used for sub-headers.
The second tag is the <a> tag, which is the tag used for creating links to other documents (“a” for “anchor”). A link is created by adding a hyperlink reference attribute (the “href”), followed by the path or URL to the document or page you want to link to. In this case, the link points to the index.html document itself. By letting the site title link to index.html you will always be able to return to the frontpage of your website by clicking the site title.
So, the structure of this part of the template design when viewed in code mode is:
<h1>
(starting tag for the header)
<a href="index.html">
(starting tag for the link to index.html)
Variant Duo
(the text of the linked header, the h1 element)
</a>
(ending tag of the link)
</h1>
(ending tag of the header)
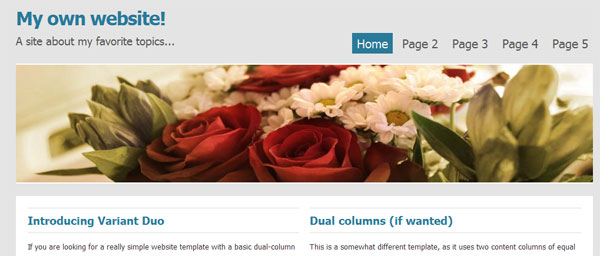
Now, without making any changes to the HTML tags, you can edit the text “Variant Duo” into something of your own, for example “My own website!” and then save the document. When you open index.html in a web browser you will see that the title now shows the text you have entered.
2. The slogan/tagline – <p> for “paragraph”
Right below the line you just edited you can find this code:
<p class="slogan">Dual-column content template</p>
The <p> tag defines a text paragraph, and here it has a class attribute with the value “slogan” added to it. Classes are used to connect specific tags to different styling definitions in the .css file, and in this case I have created a special style called “slogan”. Leave the tag itself as it is (classes and CSS will be covered in future parts of the tutorial), but edit the text “Dual-column content template” into something of your own (for example “A site about my favorite topics…”). Save the file and open it in the web browser again – and your own tagline should be in place.
Summary of changes so far…
By now, line 14 and 15 should look something like this:
<h1><a href="index.html">My own website!</a></h1>
<p class="slogan">A site about my favorite topics...</p>
…and when viewed in the browser you should see this:
Coming up next…
If you have made it this far, then editing the other parts of the template into a complete webpage will be easy! It is simply a matter of becoming familiar with a few more HTML tags. In the upcoming parts of the tutorial, I will explain how to edit the navigation menu, the header image, the main content and the footer. The next step after that will be to learn about using the <head> part of the HTML document to describe your page, and of course how to use CSS to edit the design. I will focus on the header image in the next part, as well as explaining what HTML tag attributes are and how different attributes work.
If you want to read more about the basics of HTML before the next part of the tutorial is posted, then I recommend the excellent HTML Beginner tutorial on HTMLdog.com. If you have any questions or comments regarding this part (or HTML in general), you are very welcome to post a comment below or send me an e-mail.
Move on to part 4…
This article was written by Andreas Viklund
Web designer, writer and the creative engine behind this website. Author of most of the free website templates, along with some of the WordPress themes.
14 comments:
Andreas thanks again for the next installment of your tutorial you would be suprised how maney people use it,but don’t post here i pass it on to many people like myself who are just learning from you so keep up the good work looking forward to the next one.
Thank you for the tutorial. I’m looking forward to tomorrow and part 4-6 of your very detailed article.
Regards Sylvia
Great set of tutorials thanks a lot, I remember using one of your templates years ago when making my very first site now so many years on return here to learn somethin new
all the best to you mate
-Jason
Andreas, thanks so much for all the great work and sharing your expertise with a novice like me. The templates and the html tutorial are excellent. Keep up the good work!
Dear Andreas
I want to that you so much for your tutorials , Imagine we have just started to be computer literate in our country (Zimbabwe) and we have yet to catch up with the IT world . I was deperate to understand how to make a website and there I found you, Thank you for making complicated subject so easy to understand. I have bookmarked your site and count me your student each day!!!
Thank you once more
Love from Africa.
you and your tutorials are brilliant!!
Your tutorials are excellent. Thank you!
Read this tutorial after reading part IV. Thought that I would know most of what was written here but as it turned out, although I did know quite a bit, I still gained some valuable new and relevant insight into the ‘nitty gritty’ of constructing websites. As, I mentioned in a post elsewhere, your site is simply outstanding with its plethora of templates, themes and tutorials – and just want to reiterate that it is really appreciated that you still leave these tutorials on your site (in spite of their age) as they are as relevant now as when they were first written. And, they are extremely instructive and easy to understand for most newbies (such as myself). Many thanks for sharing.
I would like to thank you Andreas for your superb website tutorials and templates. It’s so refreshing to be able to use your site as a reference point for learning how to write code and incorporate style sheets into the site to enable us to really get a feel what you can do with editor’s. I use Dreamweaver and all your code drops into it perfectly and it makes me understand how it works. Thank you for your excellent work.
Thank you very much Andreas,
I try to follow this tutorial and I have made my first website using my own coding, not wordpress.
This seems great and I think programming is so fun, especially when we are successful with some lines of codes and work like we are expecting.
Thank you so much again and I will learn more about programming.
How do you make such beautiful designs ??
thanx dear!!! you are the only one person who describe all things in such a nice way…now onwards whenever i’ ll have any problem i will contact you..
Really an awesome time to listen! I learned new skills from this!
Keep it up :)
Hej Andreas,
Har startat bolag och anlitar AB Svenska Domäner som webb-hotell.
Fick därmed tillgång till dina eminenta templates och “byggde” en hemsida = ibex.se .
Är inte speciellt begåvad på detta område och vill gärna ha extern hjälp med upprättandet/slutförandet av en snygg hemsida – har du tips på någon “byrå” som kan hjälpa mig?
mvh
Bo Linde
Mobil +46 735 24 1904