
Tutorial: Building your first website using a free website template (part 5)
This is part 5 in a series of blog posts that will explain how to use a free website template to build and publish a complete website. Read part 1 for an introduction to the tutorial, part 2 that describes how to download and unpack a template and finding an editor for your operating system, part 3 that explains how to get started with editing index.html and part 4 that explains the anatomy of the HTML element, attributes and how to replace and resize the header image.
In the previous parts of the tutorial, three sections of the template were customized. If you have followed the instructions in the previous parts, you should now have a template with your own site title, your own slogan and your own header image. Now it is time to edit the main content. But before doing that, it would be a good idea to take a look at the <head> section of the HTML code. This is what the code looks like in the Variant Duo template:
<!DOCTYPE html PUBLIC "-//W3C//DTD XHTML 1.0 Strict//EN" "https://www.w3.org/TR/xhtml1/DTD/xhtml1-strict.dtd">
<html xmlns="https://www.w3.org/1999/xhtml" lang="en" xml:lang="en">
<head>
	<meta http-equiv="content-type" content="text/html; charset=utf-8" />
	<meta name="description" content="Your description goes here" />
	<meta name="keywords" content="your,keywords,goes,here" />
	<meta name="author" content="Your Name" />
	<link rel="stylesheet" type="text/css" href="variant-duo.css" title="Variant Duo" media="screen,projection" />
	<title>Variant Duo v1.0</title>
</head>
The different tags used here are:
<!DOCTYPE> – Defines that this is a HTML document and that it is written using a web standard called XHTML 1.0 Strict. Do not edit this unless you are familiar with W3 standards and doctypes.
<html> – The starting tag for the HTML code, which includes a description of the XML namespace that XHTML uses and the language of the website (in this case, “en” for English). Again, do not edit this – unless your website will use another language than English.
<head> – The starting tag for the head section of the HTML code.
<meta> – Tags that contain structured meta data that describes the document and its content. These tags will be explained in detail below.
<link> – A tag that imports intructions from an external file, in this case the stylesheet (variant-duo.css) that defines the design of the template.
<title> – Used to give the document a title. The content of this tag is usually shown as the browser window and/or browser tab title. It is also shown when the page is bookmarked, and as the main title in search engine pages.
The <meta> tags
In this template, four meta tags are used. The first one defines the content type (text/html) and the character encoding of the document. For most cases, the character encoding UTF-8 will work well, but if your language requires a different character encoding you can edit this line and replace “UTF-8” with the character encoding you want to use. Read more about character encoding on Wikipedia).
The second and third meta tags define the description and keywords of the website. The description should be short (below 155 characters is recommended) and work as a summary of what the website is about. The description is usually shown on search engine result pages, so it is an important text that should be written with a lot of care. The keywords used to be important for making websites easier to find in search engines, but today most search engines index entire websites so keywords are extracted from the website content rather than just from the meta tag. Still, you should write down the 8-12 most important words that describe the content of your website here, separated by comma signs.
The fourth meta tag defines the name of the author of the document. It can be used to let people who visit your site know that you are the author of the content, but this is not required in any way and does not affect search engines in the way that the other meta tags do.
In order to describe the website that I am building, I have decided to edit three of the meta tags like this:
<meta name="description" content="Andreas' website built for the template-to-website tutorial on andreasviklund.com." />
<meta name="keywords" content="andreas,website,template,tutorial,example" />
<meta name="author" content="Andreas Viklund" />
Note that all meta tags are self-closing tags that end with />. To read more about meta tags and how they can be used, read the Wikipedia article about meta tags.
The <link> tag and the <title> tag
The <link> tag is used to tell the web browser that it should read the content of the linked CSS file, in order to include and apply the design and styles to the HTML when viewed in the browser. It is possible to include several stylesheets and display different stylesheets depending on what kind of display that the website is shown on. For example, mobile devices can show one stylesheet while regular computers can show another stylesheet. In this tutorial, you do not need to make any changes to this line – unless you want to change the file name of the .css file from variant-duo.css into something of your own.
The <title> tag is, as mentioned above, the tag that defines your website title. The default title in the Variant Duo template is “Variant Duo v1.0”, so this needs to be changed. This is how I have edited the title:
<title>My own website!</title>
Since the title (as well as the header tags of the website content) are important factors when search engines index your website, it is a good place to describe the content of your site. For example, if you build a site about your favorite dog breed, then including the name of the breed in the title will likely give your website a better position in the search engine results when someone searches for that specific breed, than it would have if you just write the name of your dog. But don’t fill the title with keywords just because of that, keep it short and simple.
To learn more about writing good descriptions, keywords and titles, make a Google search for any topic that you are interested in and study the meta tags of the top results. For example, if you search for “dogs” you can find this site about dogs which is an excellent example of how meta tags and titles can be written to cover the content topics of the site. Feel free to peek at the code on andreasviklund.com as well, if you are curious. And if you want suggestions or feedback on proper descriptions, keywords and titles for your page, don’t hesitate to contact me for guidance.
Editing the main content of the template
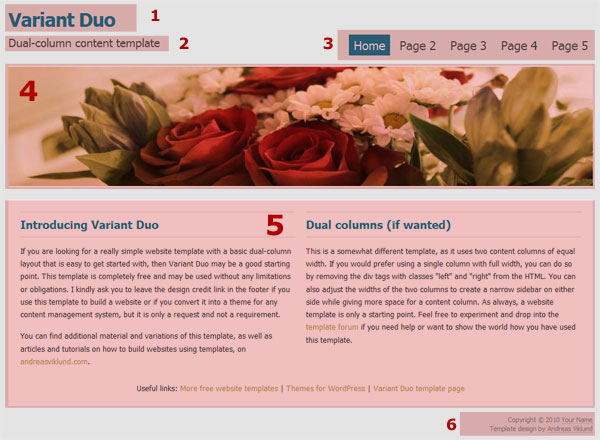
Now, finally, it is time to edit the main content and turn the template into a real website! Here is a reminder of the different areas of the template design:

The main content is area #5 in the screenshot above. It consists of two columns, and the HTML structure looks like this (I have edited the code and removed the sample text from the Variant Duo template to make the code easier to read):
<div id="content">
    <div class="left">
        <h2>Header for the left column</h2>
        <p>First text paragraph in the left column.</p>
        <p>Second text paragraph in the left column.</p>
    </div>

    <div class="right">
        <h2>Header for the right column</h2>
        <p>First text paragraph in the right column.</p>
    </div>

    <hr class="clear" />

    <p class="centered">Centered paragraph below the two columns.</p>
</div>
If you compare the code above with the code you see in the code editor, you will be able to identify each tag. For reference, this is what the template looks like in the browser using the cove above (click to open a full-size screenshot in a new window):
Before you start adding your own content, you need to delete the sample text in the template while keeping the HTML tags. You can do this by deleting the text manually, but an easier way is to delete all code starting from the line that says <div id=”content”> (which should be on line #30) and down to (and including) the closing </div> that you can find on the line just above the <p id=”footer”>, and then copying the code I posted above and insert it into the template where the code you just deleted used to be. When the code has been edited, save the .html file and view it in the browser. The page should now like the screenshot above.
The <div> structure
<div> tags are containers that define sections of the HTML where code is grouped together. The div:s can use id and class attributes that makes it possible to use the div:s to arrange the layout of the page, and div:s can also be nested by putting one or several div:s inside another div. Any content inside one div can be affected by CSS that is applied to that div if wanted.
In Variant Duo, there are a number of div:s used to create the layout. The first level is at the beginning of the content, just below the <body> tag, and it is the <div id=”wrap”>. The purpose of it is to define the width of the entire design, and it is done in the variant-duo.css file where the corresponding ID is called #wrap. Since all areas of the design should stay within the width I want to use, all content of the template needs to be inside this div. This is done by putting the ending tag for this div at the end of the HTML, just before </body>. The ability to use nested div:s means that I can put other div:s inside this first level, but it is important to notice that nested div:s must be closed before the previous div is closed.
As seen in the code, the main content area is defined by a div which has the attribute id=”content” (which is styled by #content in the CSS). After the opening tag for div=”content”, there is a new opening tag for a div which use the class=”left”. After the opening tag of div class=”left” comes the actual content of the left column – which is followed by a closing </div> that closes div class=”left”. The next line opens a div that uses class=”right”, and it includes the content in the rigt column before div class=”right” is closed by another </div> closing tag.
Below the two columns there is a <hr (> tag (horizontal ruler, self-closing) which is not visible in the design but which has a CSS style that tells the browser that anything below it will not be affected by the two columns. Anything below the clearing <hr /> will use the full width of the main content area. And finally there is a text paragraph which uses class=”centered” that makes the text in the paragraph centered (through the line starting with .centered in the CSS). At this point the main content div is still open, so there is a final </div> that closes the main content area.
Insert your content!
By now, editing the main content should be easy. In the left column you have a header and two paragraphs that you can use if wanted. You can add more headers (including <h3> sub-headers) and more paragraphs as needed, and you can insert images by using the <img> tag, like this:
<img src="images/my-content-image.jpg" alt="My content image" />
Just make sure that images are not wider than the width of each column (461 pixels), as inserting bigger images than that will break the layout. The Variant Duo does not include any styles for aligning or positioning images, but it can be added by creating a few CSS classes if you need it. Once you have the left column content ready, proceed to the right column and add the content you want to use there. Remember to close all tags properly, including the paragraphs. If you want to make a single line-break, you can use the <br /> tag. Headers and paragraph elements can not be nested in the way div:s can. Each header and each paragraph must stand by itself.
Create more pages
To create more pages for your site, simply copy index.html into a new file, for example about.html, and edit the main content section for it. Create as many pages as you need. I will use three pages in the example in the next part of the tutorial where the navigation menu will be created, but you can of course use more pages if you want to.
The alternate layout – one column only
And finally, there is a bonus feature in the Variant Duo template that may be useful for you. You do not need to use the left and right column div:s. You can just as well remove them and write your content directly into the div with id=”content”. If you do so, your content will fill the entire width of the main content area in a single column.
Moving on…
Continue to part 6…
This article was written by Andreas Viklund
Web designer, writer and the creative engine behind this website. Author of most of the free website templates, along with some of the WordPress themes.
